Badges. Or, “What Are All Those Funny Icons, Anyway?”

By PhotoJoseph
February 8, 2010 - 4:02am
In Aperture, there are loads of little icons and badge that can be confusing if you’re not used to them. Here’s a breakdown of them all, going clockwise.
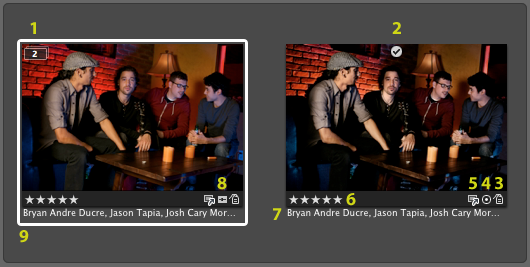
- When images are Stacked, the top of the stack gets this little box with a number in it. The number tells you how many images are in that stack. Stacks can be manually created (when you stack a group of similar shots in order to pick the best one), or automatically (when you create a new version of an image, it’s added to the stack). Clicking on this icon will close or open the stack.
- That’s the Album Pick icon. This is a confusing one, so here you go… when you stack images, the top image on the stack is called the Stack Pick. You can select any image in the stack and choose menu Stack > Pick. When you close the stack, the stack pick is the one on top. But let’s say you add a stack to another album; let’s say that’s an album for your black and white images. And you’ve created a black and white version of an image, which is living in a stack. When you add that stack to the B&W album, you want that image to be on top of the stack. But in your other albums, you want a different on on top. Enter the Album Pick. Select an image, and from the menu choose Stack > Set Album Pick. The image will get that little check-mark badge, and when you close the stack in that album, it will be your “stack pick”. But in other albums, the actual stack pick will still be on top. Make sense? It’s odd, but very important.
- The tag-looking badge is the keywords badge. All it means is that you have keywords applied.
- The target-looking badge is the external editor badge. It means that this image has been edited by something other than Aperture.
- The box with the arrow indicates that this is a referenced image, meaning the actual file lives outside of the Aperture library. This box has variations, not shown here… if it has a red slash through it, then the image is offline. That means the hard drive with the actual image file is not currently connected to your Mac. If you see that box with a yellow warning triangle, that means that Aperture has lost the connection to the master file and doesn’t know where it is. If you find yourself there and don’t know how to get out, there’s an eBook for that… (hmm, maybe I should make these into iPhone apps so I can say “There’s an app for that”!). Check out Tip 10 in 10 Tips on File Management in Aperture.
- The stars are the star rating. Rate your images with the + or – keys, or the 9, 0, 1, 2, 3, 4, 5 keys and you’ll be speed-rating in no-time.
- These are the keywords you’ve added. So why do you need the badge (#3) when you can see the keywords here? Because you can hide the keywords themselves, but still know they are applied.
- The box with the slider is the adjustments badge. This tells you that adjustments have been applied to this image. As soon as you touch any slider in the Adjustments tab, that icon will appear. A very handy use of this is knowing which images have not yet been adjusted. You can build a smart album showing images that do NOT have adjustments, and instantly see what work you still have to do before delivering to a client.
- The big white box around a thumbnail tells you that this image is the primary selection. Meaning even if you have multiple images selected in the Viewer, the one with the fat white box will be the one that’s affected by any adjustments you may make. A thin white box (not shown here) indicates that it’s a selected, but not the primary selection.
That covers ‘em! One last icon that can show up in the Viewer is Master Image.
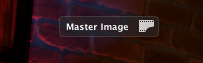
This tells you that you’re viewing the Master Image, or the original, without your adjustments applied. Tap the M key to toggle that view on and off.
If you’re interested in the photos from that shoot, check a few of ‘em out on my photography blog, here.
More like this
- Tip
- Tip
- Tip
- Forum
- Forum
Comments
on April 21, 2011 - 4:43am
Hi Joseph
Am I able to search Aperture for a specific badge ie and photos I have edited in PS Elements
on April 21, 2011 - 6:30am
Hey have just found the answer. Have posted it below may help someone else.
1.) select your project or album.
2.) On the upper right of the Aperture screen, click the small magnifying icon (note this is not the search one that is further to the right. it’s right under the “Faces” toolbar button).
3.) On the right of the filter dialog box, select “Add Rule” and then select “File Type”.
4.) It will add an File Type filter to the dialog box. Now just select “IS”, “Externally Edited” from the drop downs.
on December 12, 2011 - 6:46am
Hi
I have 3 images with a badge I am unable to find the meaning of. It is a badge that has a “R” on a square box. Any ideas? Forgive me if I’ve missed the answer within the forum subjects.
paul
on December 13, 2011 - 6:43am
Paul,
Funny, I recently was looking back on this post and realized I’d left that one off :)
If you shoot RAW+JPEG and import both, you can choose which one is the Master. That [R] tells you that it’s a RAW+JPEG pair, and that the [R]aw file is the master. You can switch it to the [J]PEG by choosing the menu Photos > Set JPEG as Master (and switch back again with the Photos > Set RAW as Master at any time).
@PhotoJoseph
— Have you signed up for the mailing list?
on January 15, 2012 - 10:55pm
Just found this site by looking up exactly that issue: what is that J in a box doing there! Thanks to you, I got my answer!