The New Eye-Fi mobi Card

Many regular readers already know that I’m a big fan of the Eye-Fi cards. If you’re not familiar with them, basically an Eye-Fi card is an SD card with a built-in WiFi antenna, allowing you to do things like automatically upload photos from your camera to a variety of photo sharing sites, directly to your computer, or even to your smart phone.
One of the great uses of the Eye-Fi card is wireless tethered shooting, in the field or in the studio. In fact over three years ago I wrote an extensive article about setting it up, and even integrating Aperture’s fantastic RAW to JPEG matching-on-import capability. You can read that post here: “Wireless Tethered Shooting Using Eye-Fi & Aperture 3, and Matching RAW to JPEG After the Shoot”.
Unfortunately, setting these cards up has never been their strong point. To do something as seemingly simple as transfer photos from your camera to your iPhone, you first had to connect the card to your computer, install proprietary Eye-Fi software, configure the card there (a multi-step process on it’s own), install an app on your phone, put the card into the camera, install a configuration file on your phone, and hopefully finally connect the card to your phone. I say “hopefully” because it’s not always the most reliable of setups. Given the advantages, many of us were willing to put up with it, but frankly we all wished it it was easier and more reliable.
Enter the Eye-Fi mobi [16 GB for $75, 8 GB for $50 on amazon.com]. This is a new, simplified version of the famous Eye-Fi card. As the name implies, it’s all about mobile, and that’s all this card does — transfer photos from your camera to your mobile phone. And because that’s all it needs to do, there’s no computer involved, and setup couldn’t be easier.
 The Eye-Fi mobi card
Setting it up
Setup is extremely straight forward. All you have to do is put the card in your camera, install the Eye-Fi app from the App Store (visit eye.fi/mobi from your mobile device and you’ll be directed to the iOS or Android app store), and you’ll be prompted to enter a 10-digit code that’s unique to and included with your card. From there it’s just a few taps here and there while the phone is configured, and then you’re done! Start shooting with your camera, and the pictures will automagically appear on your phone.
In my case, I already had the app installed because I already have an Eye-Fi Pro X2 card configured to it. I considered deleting the app and starting from scratch, but I figure that would actually be an easier configuration — so instead I chose to leave the it set up as-is, and to try to add the second card. The following screenshots are from my setup, with the pre-existing connection. To start, I had to tap the gear icon in the Eye-Fi app, then tap Add Eye-Fi Mobi Card.
 To start the process on a pre-existing configuration, tap the gear menu then add your mobi card
You’ll be prompted to enter your 10-digit code, and once you do, just Go and you’ll be told what to do next.
 Enter your unique 10 digit code, and Go!
At this point, the phone will change apps a few times automatically as the configuration file is located and presented to you for installation. After a few flips, you’ll see this Install Profile screen. On my system, it went through this twice, and quite possibly because I already had a profile installed for my other card. Maybe it had to update it, I don’t know… it just ran through the same routine twice, and I now have two configurations on my iPhone.
 Install the Eye-Fi mobi configuration file — I have two cards, so it asked me to do this twice
Once that’s complete, you’ll be taken back to your Eye-Fi app, and you’re done!
On my setup, there were no further instructions. I don’t know if when doing this from scratch, at this point you’re told “hey, you’re done, go take some pictures!”, but that is the next step. If there isn’t, I think there should be. You could be left wondering “now what?” if you don’t know that you’re truly done.
Shooting and transferring
Here is where the magic sauce comes in. Turn on your camera. Take a picture. Launch, or already have open, the Eye-Fi app on your phone. Watch with glee as the photo you just shot transfers to your phone. So very cool! That really is all there is to it.
iOS vs Android
On iOS, since there’s no background processing, you have to launch the app to get it to connect. It will stay connected for a while if you put it into the background, but not forever. You can however configure the app to prevent the phone from sleeping, so you know it’s always going to connect — but needless to say that will have an effect on battery life, not to mention that if you pop the phone back in your pocket you risk butt-dialing someone.
 Preventing your iPhone from sleeping can facilitate transfers, but with side effects
I understand it’s a better experience on Android, where the card and phone can be permanently connected, but with any luck we’ll see that benefit in iOS 7 — and still retain great battery life.
While at home…
The way this system works is quite straight forward. The card creates a Wi-Fi hotspot, your phone connects to that hotspot, the app smells the connections, and transfer ensues. But if you’re at home or some other location while already on a Wi-Fi connection, the app may not connect to your Eye-Fi card. Sometimes it does, but sometimes it doesn’t. This is never a problem when you’re out and about — which is when you’ll most likely be using it — but on those occasions when you’re home and want to connect, it can be a little frustrating.
Fortunately there’s an easy way to force the connection. Just launch the Settings app, go to Wi-Fi, and tap on your Eye-Fi card’s network. The phone will immediately connect, transfer will ensue, and as soon as it’s done, the Eye-Fi app will drop the connection to the card, and you’ll be back to your home network in no time.
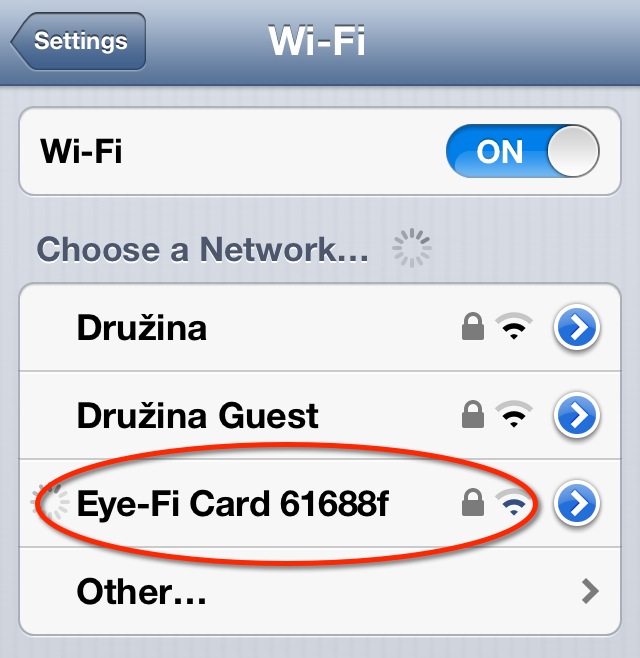 Here I’m forcing the iPhone to connect to my Eye-Fi card, since it’s already connected to my home network
So what’s the point?
Well, I think most readers get that already, but just in case…
We’re a culture that loves to share our lives. We post photos of interests on Instagram, our family on Facebook, our tortellini on twitter. And while our mobile phone cameras are pretty darn good, they aren’t our dSLRs, our Fuji X100s, our micro four-thirds. Those cameras are still better, and always will be better, and those of us that carry them will probably keep on wanting to share instantly. Sure we can go home, offload the photos and share from there — but it’s so much more fun, more satisfying, and frankly quicker to share it in the moment. That’s what this card gives you. The ability to share your world the same as you currently do — but with a better camera.
Plus, you get to use all those lovely mobile apps. Here’s a little example… shot on the X100, transferred to the iPhone, and doctored up in Snapseed. Schwing! Gaggles of gardening goodness.
 Shot on the X100, transferred to iPhone via Eye-Fi, treated in Snapseed
So what about Aperture?
In a future post I’ll talk about how this and other Eye-Fi cards can integrate into Aperture, but for the moment I’ll leave you with this — Eye-Fi + Photo Stream = never having to copy photos off your card again. Think about that. (And when you buy your next iPhone, get the 64GB… you’re gonna need it).
Also in a future post, I’ll talk about swapping connections between multiple iOS devices. Sometimes I want to connect to my iPad instead of the iPhone, so I’ll be looking into that too.
I’ve been enjoying the Eye-Fi products for years now, and highly recommend them. Pick up your card on amazon: Eye-Fi mobi [16 GB for $75, 8 GB for $50 on amazon.com]
Comments
on August 1, 2013 - 10:05am
Great post Joseph, I’ve had an Pro X2 card since it came out, but unfortunately since I switched from iPhoto to Aperture 3 over a year ago I haven’t used the card much. I’m really disappointed in the lack of Aperture 3 support for the Eye-Fi card. I have read your post from 2010 on setting up wireless tethering and I setup the Hot Folder to actually import both JPEG+RAW. While the import works, it does not import using the JPEG or RAW as the original like I want. It will only import both files as separate originals.
The Mobi card looks like a good solution for quickly getting the JPEGs off of my camera to my iPhone. However, I would still need to get the RAW files to my computer and I think the Mobi card is JPEG only (for good reasons).
I look forward to reading any future posts on integrating the Eye-Fi cards, especially the Pro X2 with Aperture 3. If I could do this, my workflow would be complete.
on August 3, 2013 - 4:28am
Joseph: I get it about the eyefi-mobi card. I really do. I even get “so what’s the point”. But permit me a word about what I consider a pretty big deficiency for these kinds of cards (Flashair too, I think).
When you transfer the photos, the card does not seem to transfer metadat such as GPS data. So why does that matter? What if you wanted to make a journal in iPhoto/ios version. Assume you wanted to use geo locations in your journal. Not unlike your tutorial on the app. Well if the GPS data is not there, then the ‘ease-factor’ of making such a journal in iOS version of iPhoto just went a way. Compare making such a journal with photos transferred by a mobi card and photos from the iPhone. One journal is easy (iPhone) the other (mobi) does not appear to be easy at all.
I did a little test. Transferred photos from the mobi card through a card reader. The gps data is there. Transfer same photos with the mobi wireless–the gps data is not there. Also I found the tech support on this question of no help whatsoever.
Anyone have a different experience? Joseph:any tips on this?
thanks.
on August 3, 2013 - 9:18am
Correction /Same Bottom Line.
Correction /Clarification: 1: The test I ran was with the Toshiba Flashair, not the mobi.
2: My eyefi-mobi was not recognized by the camera so I returned it. But in a series of discussions with eyefi tech support at that time, I was told explicitly that geotagging will not transfer to the mobile app and that transfer of gps data is not advertised as one of its features.
Thanks. Same Bottom Line.